Written by Jack Christensen
There are a number of factory specified tests that can be performed following service to a Curta. These tests involve positioning the carriage and main body in such a fashion that the gears and levers of the Curta are shifted slightly. The purpose of this is to determine if the mating of the gears and levers has sufficient latitude so that the instrument will not miscalculate or lock up when used under less than ideal conditions.
The testing procedures differ for the Type I and the Type II. In fact, applying the test procedures for a Type I to a Type II can damage the Type II. As a result, the factory specified test procedures are best left to Curta service personnel.
However, there is one test which is very simple and can be performed by anyone. If the Curta is clean and corrosion free, as well as lubricated internally only where it is supposed to be lubricated, the following test will help determine if adjustments to some internal components are needed or not.
---
The Curta TGB Test (originally described here on Nov. 2, 2004, and named in honor of Timothy G. Blackham)
Inside a Curta, the "tens carry" subassemblies must be adjusted so that when a "9" overflows to a "0", the next more significant digit is incremented. The following procedure can confirm whether or not the tens carry mechanisms are functioning. (Note, however, that the tens carry mechanisms may function even when they are out of adjustment. If, during the following test, the crank turns with extreme hesitation, or simply catches and suddenly releases during the turn, then the Curta is improperly adjusted or damaged in some way. This can be fixed, of course.)
At the end of this test, if the digits in the Results and Revolution Counter registers do not display the numbers described here, the machine must be serviced. Adjusting each tens carry mechanism is extremely labor intensive and delicate. There are 15 tens carry subassemblies on the Type I, and 21 such subassemblies on the Type II Curta. Each subassembly consists of three precision parts. The adjustment procedure requires partial disassembly of the main body of the Curta, during which time the parts can easily be lost or damaged. Do not attempt the adjustments unless you are extremely patient, have the proper tools, and are prepared for what seems an endless trial and error ordeal. Properly adjusting all the tens carry mechanisms can take several hours and, unless done with great care, the repetitive adjustment, checking and re-adjustment procedure can damage the delicate parts.
Note: Do not apply oil to the tens carry mechanisms in an attempt to "fix" them. This area of the Curta is not to be lubricated at all...even a thin film of oil can prevent the extremely light tens carry levers from moving. See CurtaRepairs for further information.
During the TGB test procedure, turn the crank slowly. In steps 8 and 10 you should feel only a little hesitation as each tens carry mechanism increments the next digit.
BTW...here's a quick check that you can make to confirm the "originality" of your Curta.
With care, remove the bottom baseplate (often called the "nameplate") of the machine by unscrewing the two flathead M2 screws located there. Warning! The two screws may not turn easily. You must use a VERY properly sized screwdriver or you will damage the baseplate and slots in the screw heads. These screws are very often badly corroded and may be strongly stuck in place.
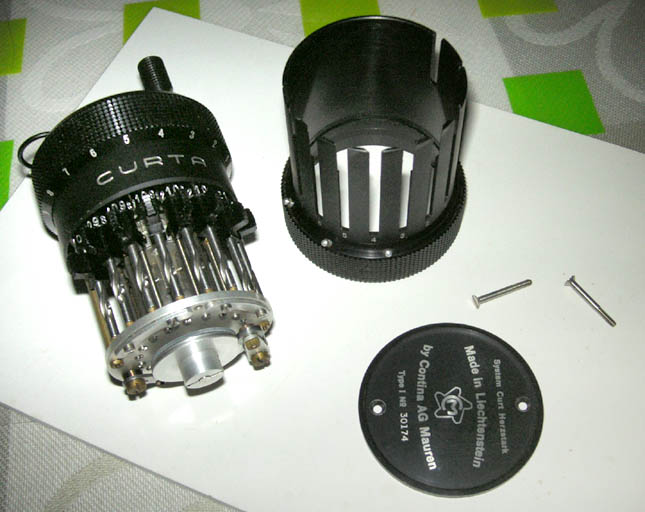 Photo by Janke of Hanko, Finland
The baseplate and lower knurled hand grip may be stuck together. These parts are never actually fastened together, but they may have become conjoined with corrosion within the knurled hand grip's circular groove in which the baseplate rests. In such situations, the entire body shell, knurled hand grip, and baseplate will likely slide off as one piece.
If the body shell and knurled hand grip did not come off when the baseplate was removed, take care that the machine does not accidentally slip out of the shell/hand grip during handling.
With the bottom of the Curta removed, you can verify that the baseplate serial number is repeated inside the machine. Most machines have a small black oval inset (not visible in the photo above) on the lower aluminum casting. The serial number is photographically printed there. Very old Curtas have the serial number machine engraved, or even inscribed by hand, on the aluminum casting. A few have a black oval insert with the serial number engraved on the insert.
If the body shell and knurled hand grip came off during this procedure, you may have to gingerly re-position the body shell as you slip it back in place. This is because the "fingers" at the top of the body shell (that extend upward between the sliders) may have expanded outward slightly after it was slipped out from under the "CURTA" labeled upper collar. This makes it hard to replace because you must simultaneously depress inward all the fingers while you slip the shell under the collar. A nice trick to aid in the re-assembly is to move all the setting sliders to their lower positions. Then begin sliding the body shell back onto the machine. With the body shell just about touching the edge of the collar, slip a rubber band around the upper part of the shell (above the slider knobs). The entire upper part of the shell will slightly compressed inward, and you can now slide the shell under collar. It works every time. :-)
IMPORTANT! While the baseplate of the Curta is off, do not turn or remove any screws within the body of the Curta. If you were to remove the setting slider retaining plates, the setting slider shafts can shift downward, pushing brass spacer bushings out. Each brass bushing was individually selected during assembly, and must be paired with its original setting shaft. This is so the combined length of the shaft and bushing is proper for each slider position in the machine.
As a final note, be aware that re-installing the two M2 baseplate screws can be very tricky. The alignment of the two holes in the baseplate with the two threaded screw holes in the lower aluminum casting must be done with great care. You will have to "eyeball" the alignment as the baseplate is located into the circular groove of the knurled hand grip. You may find that using a toothpick to "find" the threaded screw hole may help. Once the end of the toothpick is in the threaded screw hole, you can rotate the baseplate slightly so the toothpick is perfectly vertical. One of the M2 screws can then be put through the other baseplate hole...the threaded screw hole in the lower casting for that screw will be easier to locate.
And another Warning! Do not over-tighten the baseplate screws!